Traffic management
Traffic management is done via Rule Sets. A rule set can contain any number of rules, with each rule containing any number of filters. Multiple different rule sets can be created to fit different needs and requirements, with only one being active at a time.
Each rule within a rule set defines one or more tapping points, the destination for the tapped traffic, and the filters applied to that traffic. Rules operate independently from each other.
Each filter within a rule defines which part of the traffic will be allowed or dropped. Filters within a rule operate in conjunction with each other, allowing for precise targeting of the desired traffic.
Active Rule Set
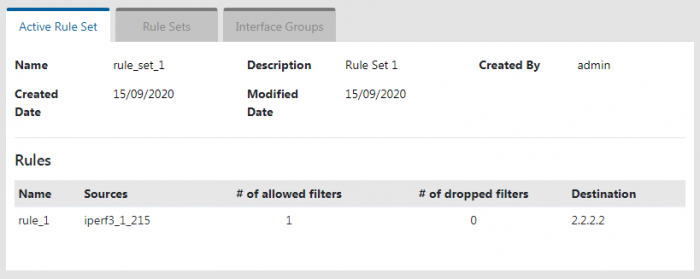
The Active Rule Set page provides information about the currently active rule set, and about the rules it contains.
Rule Sets

The Rule Sets page lists the existing rule sets, highlights the current active rule set, and provides the ability to add, rename, configure, duplicate, activate, and remove rule sets.
A rule set can contain multiple rules. Each rule defines which traffic will be tapped, and the destination the tapped traffic will be sent to.
Note: Only one rule set can be active at a time. The current active rule set is highlighted in blue in the rule set list.
Note: Modifications to the active rule set require the rule set to be applied again to take effect.

To add a rule set, click the Create Rule Set button. The Create Rule Set window will appear. Give the rule set a name by filling in the Name field. A description can also be given to the rule set by filling in the Description field. Click the Save button. An empty rule set will be created, to which rules can now be added (see Rule Set Configuration section).
To rename a rule set, click the edit button on the line of the rule set you would like to rename. The Edit Rule Set window will appear. The process is the same as when adding a rule set.
To configure a rule set, click the configure button on the line of the rule set you would like to configure. Refer to the Rule Set Configuration section for more information.
To duplicate a rule set, click the duplicate button on the line of the rule set you would like to duplicate.
To activate a rule set, click the apply button on the line of the rule set you would like to activate.
To remove a rule set, click the remove button on the line of the rule set you would like to remove.
Rule Set configuration
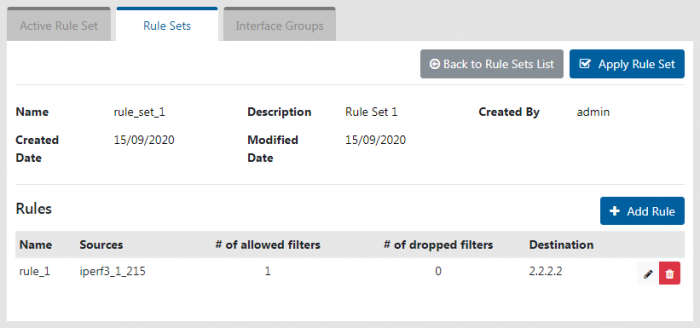
The Rule Set Configuration page provides information about the rule set, and lists the rules it contains. It provides the ability to add, edit, duplicate, and remove rules, to activate the rule set, and to go back to the list of rule sets.
To activate the rule set, click the Apply Rule Set button.
To go back to the list of rule sets without activating the rule set, click the Back to Rule Sets List button.
Rule configuration
Rules are processed independently from each other. Each rule can contain complex filters for targeting specific traffic.
Each rule defines the following:
- the interface(s) and/or group(s) of interfaces;
- the direction of the traffic for each interface and/or group of interfaces;
- the filter(s) that will be applied to the tapped traffic;
- the destination for the tapped traffic.
To add a rule to the rule set, click the Add Rule button. The Create Rule window will appear. Refer to the Create Rule section for information about the rule creation process.
To edit a rule, click the edit button on the line of the rule you would like to edit. The Edit Rule window will appear. The process is the same as when creating a rule.
To duplicate a rule, click the duplicate button on the line of the rule you would like to duplicate.
To remove a rule, click the remove button on the line of the rule you would like to remove.
Create Rule — Interfaces
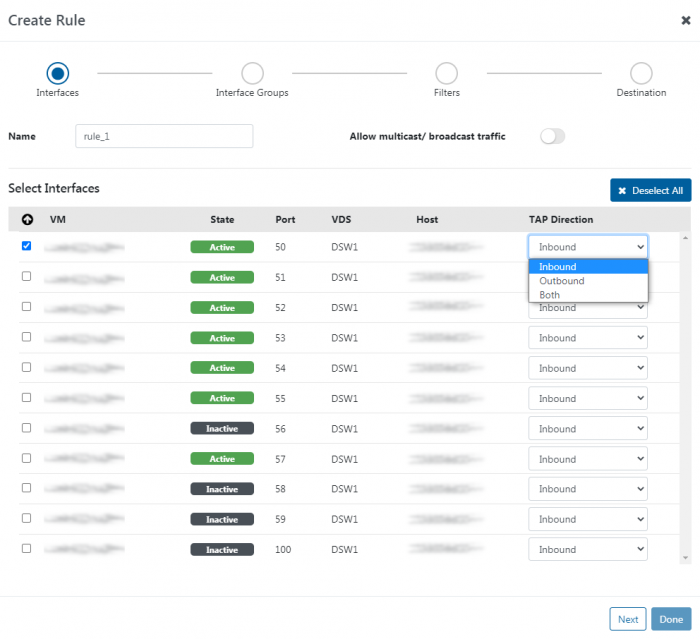
Fill in the Name field to name the rule. If empty, a rule name will be automatically created.
Click the Allow multicast/broadcast traffic switch to include multicast and broadcast traffic in the tapped traffic.
Select the interfaces you would like to tap by ticking their checkbox. For each of the selected interfaces, select whether you would like to tap inbound traffic, outbound traffic, or both, in the TAP Direction drop-down menu.
Clicking the icon above the checkboxes reorders the list so that all currently selected interfaces appear at the top of the list, for a better overview of selected interfaces.
Note: Selecting interfaces on this page is not required. However, at least one interface or interface group must be selected to complete the rule creation process. Interface groups can be selected on the next page.
Create Rule — Interface Groups
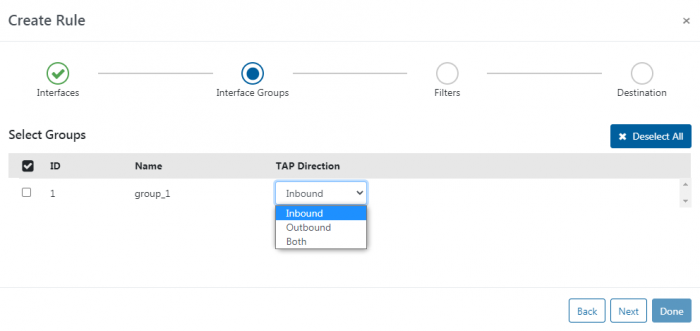
Select the interface groups you would like to tap by ticking their checkbox. For each of the selected interface groups, select whether you would like to tap inbound traffic, outbound traffic, or both, in the TAP Direction drop-down menu.
Note: Selecting interface groups on this page is not required. However, at least one interface or interface group must be selected to complete the rule creation process. Individual interfaces can be selected on the previous page.
Note: The TAP Direction setting of individually selected interfaces supersedes that of the selected group(s) they are part of.
Note: For interfaces that are present in two or more of the selected groups, the TAP Direction setting of those groups are merged (i.e. Inbound + Outbound, Inbound + Both, and Outbound + Both are treated as Both).
Create Rule — Filters
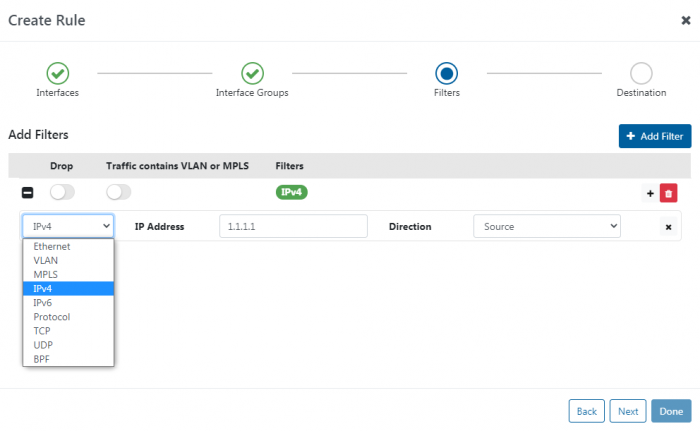
Multiple filter rows can be created, and each filter row can contain one or more statements.
To add a filter row, click the Add Filter button. A filter row with one statement will be created. To add more statements to a filter row, click the add statement button of that specific filter row. To remove a statement from a filter row, click the remove statement button of that specific statement. To remove a filter row, click the remove button of that specific filter row.
No filters
If no filter rows are present, all traffic for the selected interfaces and their selected TAP direction will be tapped and sent to the destination.
“Allow” filter rows (Drop option off)
“Allow” filter rows are logically disjunctive (OR), and thus any traffic matching any “allow” filter row will be tapped and sent to the destination, except for the parts of that traffic that match “drop” filter rows.
“Drop” filter rows (Drop option on)
“Drop” filter rows are logically disjunctive (OR), and thus any traffic matching any “drop” filter row will be dropped.
If only “drop” filter rows are set, all traffic will be tapped and sent to the destination, except for traffic that matches any of these “drop” filters.
Traffic contains VLAN or MPLS
When enabled on a filter row, this feature includes VLAN- and MPLS-tagged traffic for this filter row (up to 2 layers of encapsulation).
Filter statements
Statements within a filter row are logically conjunctive (AND), and thus each filter row only applies to traffic which matches all of the statements within that filter row.
Filter types
The Filters column of each filter row provides an overview of the filter types of all statements present in the filter row.
The leftmost drop-down menu of each statement allows the selection of the type of filter for this statement. The rest of the fields and drop-down menus in that statement will depend on the selected filter type.
Ethernet
MAC Address: specify a MAC address.
Direction: select whether the targeted traffic should match the specified MAC address as Source, Destination, or both.
VLAN
VLAN ID: specify the VLAN ID that the targeted traffic should match.
MPLS
MPLS Label: specify the MPLS label that the targeted traffic should match.
IPv4
IP Address: specify an IPv4 address.
Direction: select whether the targeted traffic should match the specified IPv4 address as Source, Destination, or both.
IPv6
IP Address: specify an IPv6 address.
Direction: select whether the targeted traffic should match the specified IPv6 address as Source, Destination, or both.
Protocol
Select the protocol that the targeted traffic should match.
TCP
Select whether the targeted traffic should match a specific TCP port (Single) or a range of TCP ports (Range).
If Single is selected, type in the TCP port in the Port field.
If Range is selected, type in the first TCP port of the port range in the Begin field, and the last TCP port of the port range in the End field.
Direction: select whether the targeted traffic should match the specified TCP port or TCP port range as Source, Destination, or both.
UDP
Select whether the targeted traffic should match a specific UDP port (Single) or a range of UDP ports (Range).
If Single is selected, type in the UDP port in the Port field.
If Range is selected, type in the first UDP port of the port range in the Begin field, and the last UDP port of the port range in the End field.
Direction: select whether the targeted traffic should match the specified UDP port or UDP port range as Source, Destination, or both.
BPF
BPF allows the input of expressions using the Berkeley Packet Filter syntax.
Create Rule — Destination
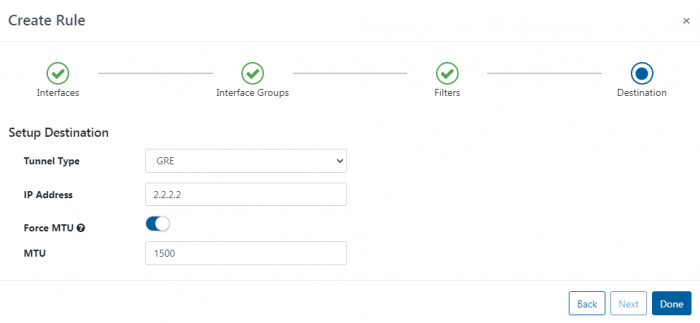
Specify the destination to which the traffic will be sent, and which tunneling protocol to use.
The supported tunneling protocols are GRE and ERSPANv2.
Select a protocol, and type in the destination IP address in the IP Address field. If ERSPANv2 is selected, a tunnel ID must also be provided in the Tunnel ID field.
Note: The destination must be reachable from the vNPB in order for it to receive the traffic.
If Force MTU is disabled, the packets can be larger than the MTU of the network, which would lead such packets to be dropped. If the user is certain that the packets will always be smaller than the MTU (for example, VoIP packets are usually ~500 bytes), this setting can be disabled, leading to increased performance of the virtual broker.
If Force MTU is enabled, the final size of the packets can be controlled with the corresponding setting (in bytes).
Interface Groups

The Interface Groups page lists the existing interface groups, and provides the ability to add, edit, and remove interface groups.
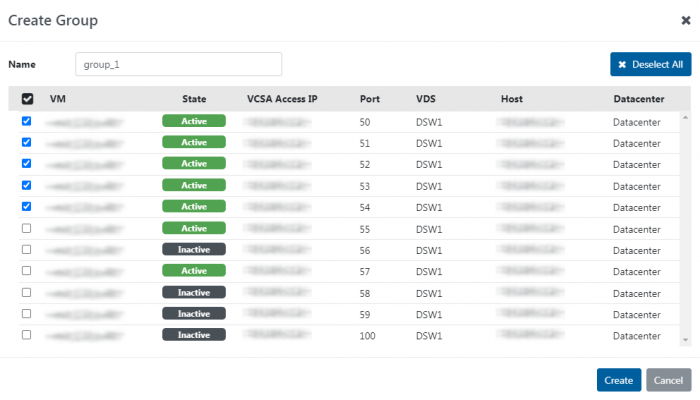
To add an interface group, click the Create Group button. The Create Group window will appear. Give the group a name by filling in the Name field, then select the interfaces you would like to include in the group. Click the Create button.
Clicking the icon above the checkboxes reorders the list so that all currently selected interfaces appear at the top of the list, for a better overview of selected interfaces.
To edit an interface group, click the edit button on the line of the group you would like to edit. The Edit Group window will appear. The process is the same as when adding a group.
Note: The list of interfaces only shows interfaces which can be tapped.
To remove an interface group, click the remove button on the line of the group you would like to remove.