Remote site network analysis
Learn more about the IOTA solution at profitap.com/iota
Problem description
In many cases, faults in the network do not occur directly where specialist staff for network analysis is available. At the same time, travel to remote locations is time-consuming and expensive. This means that network troubleshooting staff must be able to carry out a remote recording, and, in the best case, remote analysis. However, this poses technical network challenges since incoming firewall rules and, if necessary, port forwarding is required for classic VPN technologies. In addition, there is a risk of a data breach when sending sensitive recorded data.
Remote analysis workflow
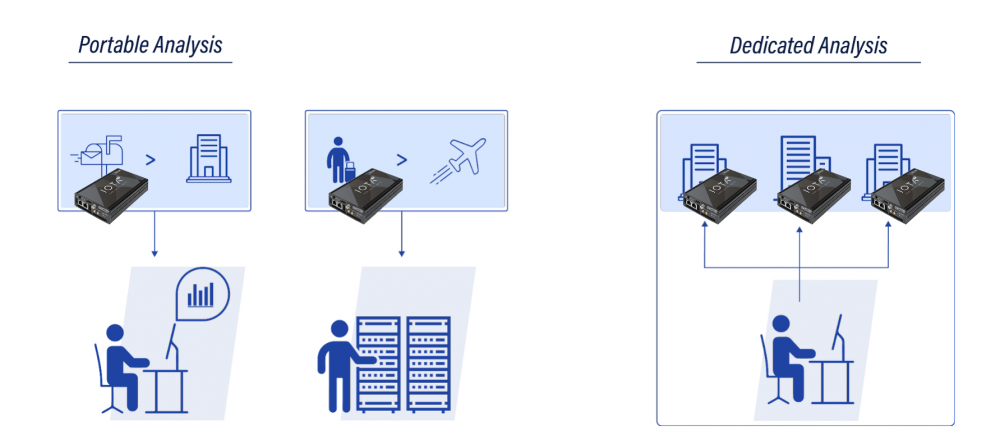
The following processes show how an analysis with the Profitap IOTA can be carried out at a remote location, with first preparing the IOTA, and then sending it to a remote location. Recording can then begin at the remote location with the push of a button. For the analysis, there are two possible scenarios: remote analysis via a ZeroTier VPN, or return and analysis of the recorded data locally.

Preparing the IOTA for remote recording
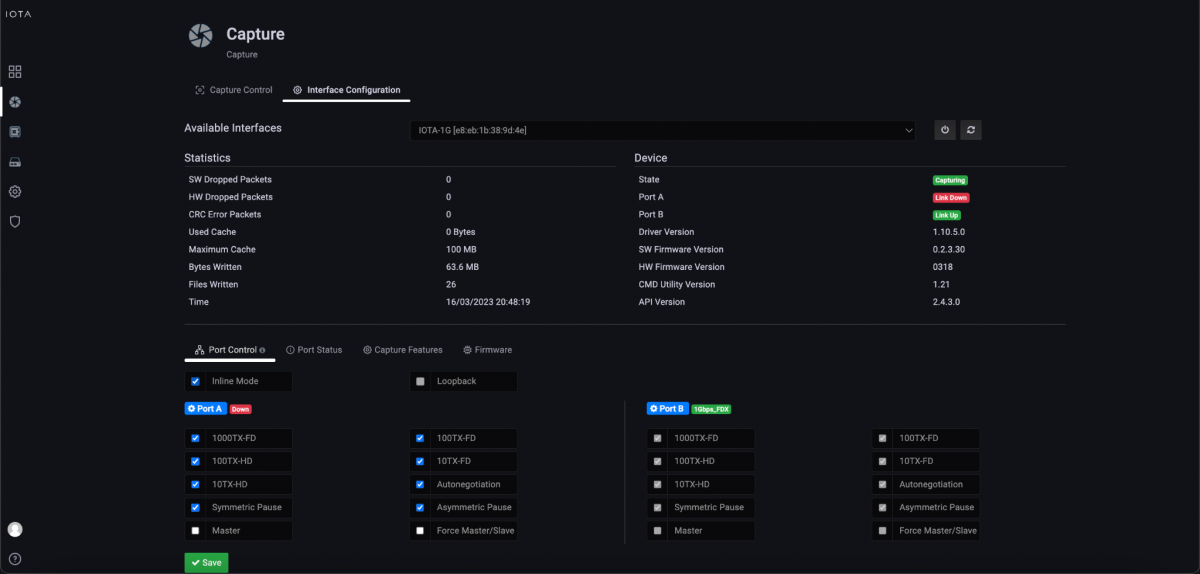
First, we prepare the IOTA for the desired capture mode. To do this, we connect to the web interface via a browser, using the management IP address of the IOTA. We navigate to the Capture > Interface Configuration page using the left menu.
If we plan for the IOTA to receive data from the SPAN ports of a switch or from a TAP, we leave the checkbox next to Inline Mode unticked. If we plan on operating the IOTA in-line between two network devices, we tick the Inline Mode checkbox. We save the settings by clicking the Save button. If the default administrator password hasn't yet been changed, we do so by navigating to the Change password page using the User menu at the bottom left-hand corner of the screen. This is sufficient preparation if we only want to record at the remote location.

Figure 1: Setting the capture mode on the Capture > Interface Configuration page.
The IOTA is then sent to the remote location. Once the IOTA arrives at the remote location, it is connected either in-line or to a SPAN port or TAP. Power is supplied via the included power supply, which boots the IOTA.
After a successful boot, the Capture LED lights up green. A push of the Start/Stop button starts the recording process. This does not require any higher technical expertise. The Capture LED flashes to indicate that traffic capture is taking place. When the recording is to be stopped, the Start/Stop button can be pressed.
The IOTA can then be turned off and sent back for evaluation. Since the data is stored on the internal SSD with AES 256-bit encryption, there is no need to worry that being lost or stolen in transit will become a data protection incident. A potential attacker would need valid credentials to access the data.
Preparing the IOTA for remote analysis
To perform a remote analysis, we need to prepare the IP settings of the IOTA on the remote site and prepare the ZeroTier VPN. ZeroTier is an easy-to-set-up VPN service that only requires outgoing connections and opens the return path via UDP hole punching. It therefore does not require any port forwarding or incoming firewall rules.
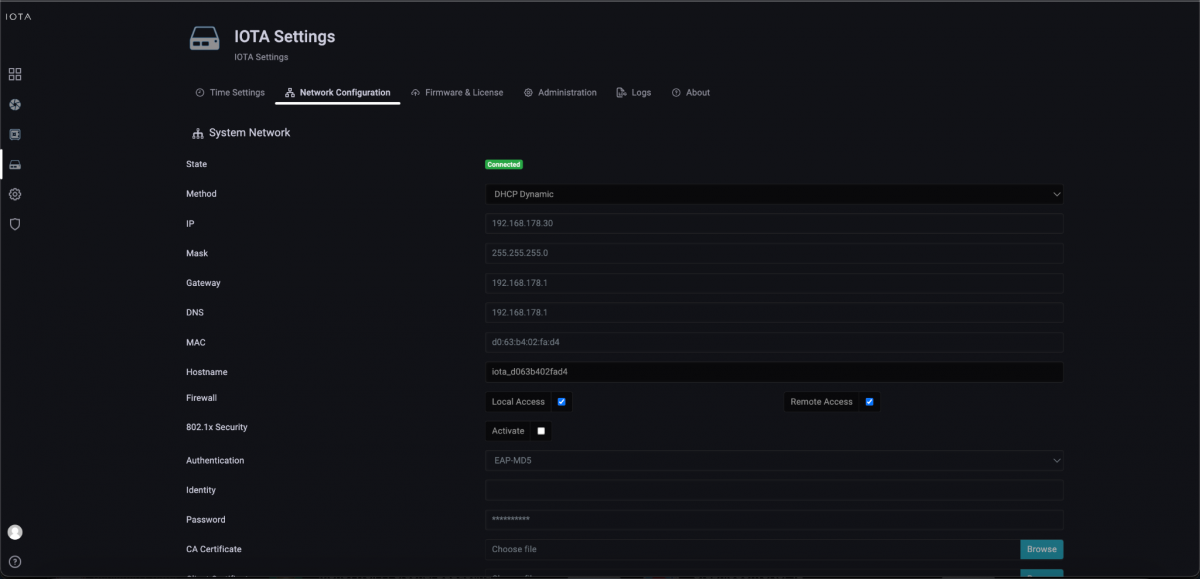
To adapt the IP settings to the IP network of the remote location, we set them to either DHCP or the location-specific fixed IP addresses in the IOTA Settings > Network Configuration page, allow remote access by activating Remote Access and confirm the settings with Apply.

Figure 2: Setting the site-specific IP settings and activating remote access.
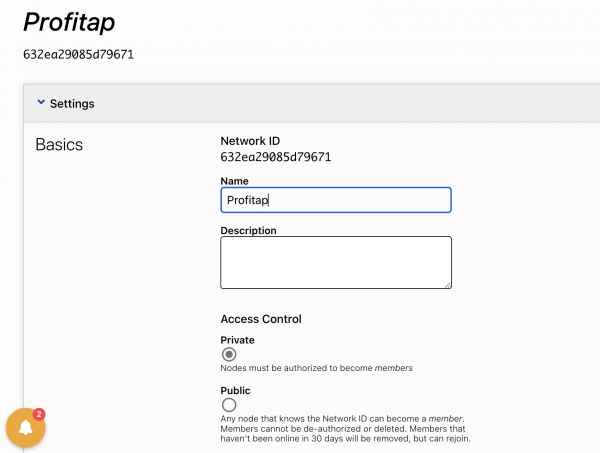
To use ZeroTier, we navigate to zerotier.com and create an account. After the subsequent login, we create a new network via the Create a Network button, give it a name, and write down the Network ID. To control joining the ZeroTier network, we ensure “Private” mode is set, which means the administrator must first authorize nodes before they are granted access. ZeroTier generates the 16-digit Network ID automatically.

Figure 3: Creation of a new private network named Profitap.
We then install a ZeroTier client on the management PC. The client is available for operating systems such as Windows, macOS, Linux, and BSD. After the installation, we execute the “Join Network” function by entering the 16-digit Network ID.
In the next step, we connect the IOTA to the ZeroTier network. To do this, we enter the ZeroTier Network ID on the IOTA Settings > Network Configuration page and confirm the entry by clicking Activate.

Figure 4: Entering the 16-digit Network ID and activating ZeroTier.
As soon as the IOTA is connected to the Internet via the management interface, it appears in the ZeroTier management interface of the network and must be authorized by clicking the checkbox under “Auth?”. Then, as shown in Figure 5, we see the assigned “Managed IP” that was assigned by ZeroTier.

Figure 5: Authorization of the IOTA in ZeroTier
We can use this IP address to connect to the IOTA web GUI to analyze the traffic.
The IOTA is then sent to the remote location. Once the IOTA arrives at the remote location, it is connected either in-line or to a SPAN port or TAP. The device is then connected to the Internet through the management port. PoE is used on the management port, or a power supply is connected, which boots the IOTA.
After a successful boot, the Capture LED lights up green. A push of the Start/Stop button starts the recording process. This does not require any higher technical expertise. The Capture LED flashes to indicate that traffic capture is taking place. When the recording is to be stopped, the Start/Stop button can be pressed.
Alternatively, the recording process can be started and stopped via the web GUI. We can then use this remote connection to start the analysis directly without waiting for the time-consuming return transport.
IOTA benefits
IOTA provides a variety of options for recording and analysis. Even without in-depth on-site know-how, a recording can be started and stopped by the press of a button. Thanks to the AES-256 encryption of the 1 or 2 TB SSD, IOTA also offers a high level of security.
The ZeroTier integration enables a simple VPN solution without port forwarding or incoming firewall rules to conduct analysis directly without travel times via remote maintenance.
Learn more about the IOTA solution at profitap.com/iota